Rack 的 Middleware 的執行順序
- Backend
- 26 Sep, 2020
看〈為你自己學 Ruby on Rails〉介紹 Rack 的 Middleware 執行順序看不太懂,於是就研究了一下原始碼,看看是怎麼回事
因為常常聽到 Middleware Middleware 的,但是又不太懂,於是在網路上找到龍哥寫的文章,非常簡顯易懂,跟著動手做可以知道 Rack 要怎麼使用。
但是在「Middleware 的順序?」這的章節看不太懂盤子的比喻,於是決定直接在看原始碼應該比較清楚。
最關鍵的就是這兩個 method
以這個例子來說:
class M1
  def initialize(app)
    @app = app
  end

  def call(env)
    status, header, body = @app.call(env)
    body << "\nM1"

    [status, header, body]
  end
end

class M2
  def initialize(app)
    @app = app
  end

  def call(env)
    status, header, body = @app.call(env)
    body << "\nM2"

    [status, header, body]
  end
end

class App
  def call(env)
    [200, { 'Conten-Type' => 'text/html' }, ['Hello, Rack']]
  end
end

use M1
use M2
run App.new
在使用 use M1 時,Rack::Builder 會用一個 Proc 把 M1 包起來,之後放進 @use array:
def use(middleware, *args, &block)
  ...
  @use << proc { |app| middleware.new(app, *args, &block) }
  ...
end
同理 use M2 也是。
在執行完 use M1 跟 use M2 後, @use array,就放了兩個 Proc ,順序是 M1, M2,為了方便,變寫成 [Proc#M1, Proc#M2]。
在 run App.new 時,會執行到 Rack::Builder#to_app :
def to_app
  ...
  app = @use.reverse.inject(app) { |a, e| e[a] ... }

  ...
end
組出 app 的方式是將 @use 反轉,變成 [Proc#M2, Proc#M1],接著使用 inject,並將 app 當成起始的 accumulator。
第一次迭代是 Proc#M2.call(app),其中 Proc#M2.call 就是執行了
proc { |app| M2.new(app, *args, &block) }.call(app) 就是M2.new(app) ,得到的就是 M2 的 instance,裡面包含 app,為了方便,叫做m2。
進行第二次迭代, Proc#M1.call(m2) 得到的就是 M1 的 instance,傳進去的 app 參數就是 M2 的 instance m2。
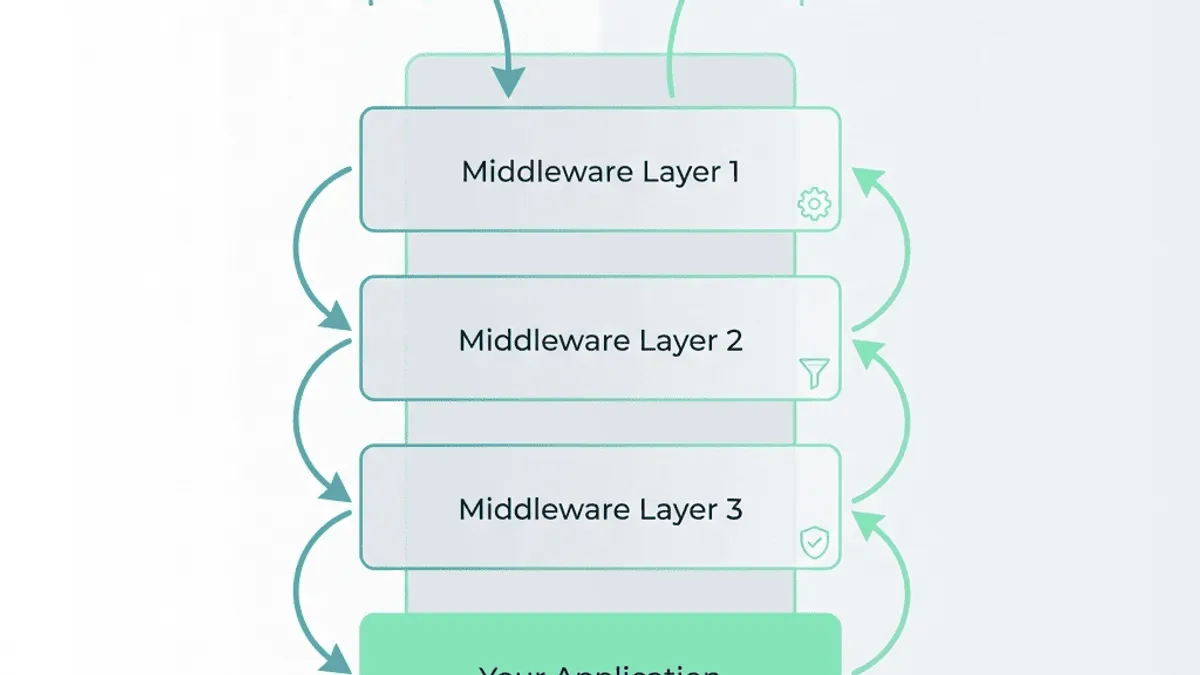
所以這樣堆疊的結果,會讓 config.ru 寫在最上面的 use Middleware 包在越外層,放在越下面的 use Middleware 包在越裏層、借接近 App。
又由於 Middleware 在 call 裡面寫的執行順序是先呼叫 app.call 再 append 自己的 body
def call(env)
  status, header, body = @app.call(env)
  body << "Over my dead body"
  [status, header, body]
end
因此最後組出來的 body,內容會從最裡面開始累加到最外面,也就是 App -> M2 -> M1,跟 use 的順序反過來。


![[Rails][MySQL] 使用 update_all + JOIN + LIMIT 需注意效能問題](/_astro/rails_mysql_update_all_v2.D1mIFHu6_2pE63e.webp)